Mastering the Look: How to Apply Lip Liner with Lipstick for Perfect Pout
Share
Want lips that look like they were done by a pro? It's not as hard as you might think. Getting that perfect pout often comes down to knowing how to apply lip liner with lipstick. Think of them as a team; they work together to make your lips look great and keep your color in place. We'll walk through picking the right shades, getting your lips ready, and the actual steps to make your lips pop.
Key Takeaways
- Start with smooth, hydrated lips by exfoliating and using lip balm before applying any color.
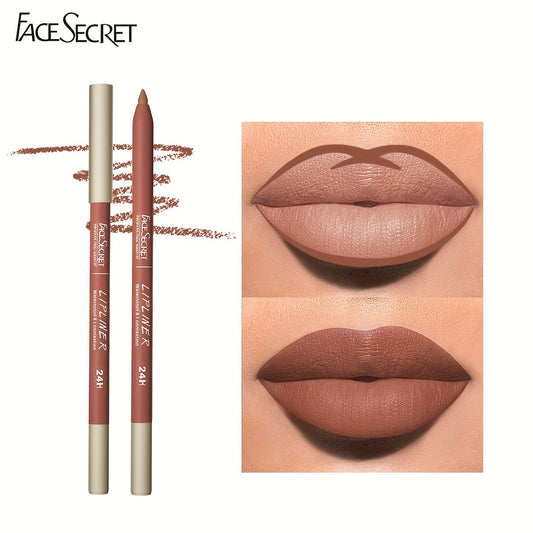
- Sharpen your lip liner for precise lines and trace your natural lip shape, or slightly overline for more fullness.
- Fill in your lips with the liner to create a base that helps your lipstick last longer and prevents it from bleeding.
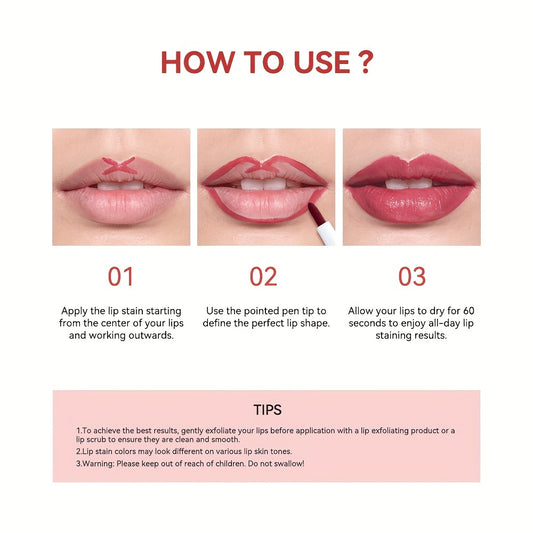
- Apply lipstick starting from the center and working outwards for even coverage, then blot and reapply for extra staying power.
- Blend the liner into the lipstick with a brush or finger for a soft, polished look without harsh lines.
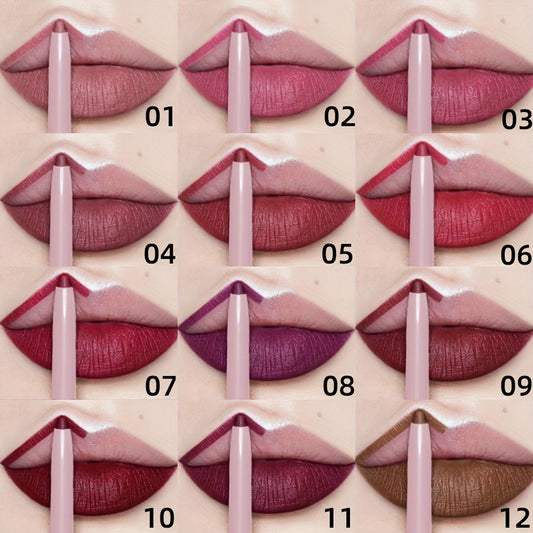
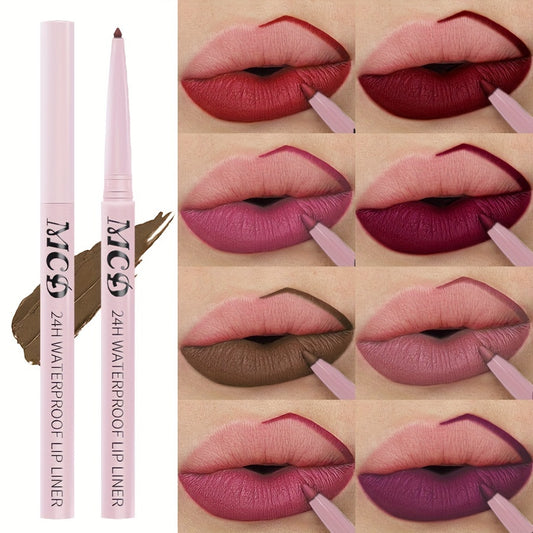
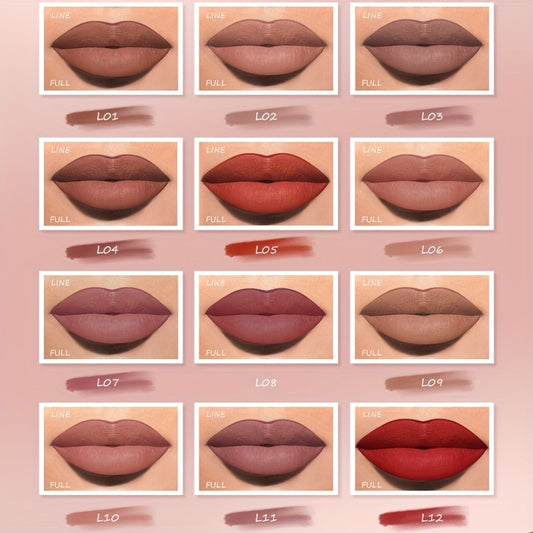
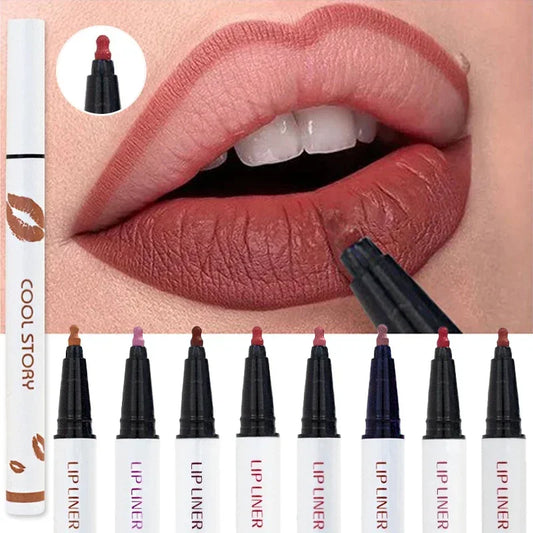
Selecting the Perfect Pair: Coordinating Lip Liner and Lipstick Shades
Picking the right lip liner and lipstick combo is kind of like choosing the perfect accessories for an outfit – it really pulls everything together. You don't want your liner to look like a weird, obvious line around your mouth, right? So, let's talk about how to get it right.
Matching Your Liner to Your Lipstick
This is usually the safest bet for a polished look. When your liner and lipstick are the same shade, or very close, it creates a smooth, unified color on your lips. It also does a great job of keeping your lipstick from bleeding outside your lip line, which nobody wants. Think of it as a neat little barrier.
- For a natural look: Use a liner that matches your natural lip color and fill in your lips completely before applying lipstick. This gives you a great base.
- For bold colors: Always match your liner to your lipstick. If you're going for a bright red, use a red liner. It makes a huge difference in how clean the final look is.
- When in doubt: A nude liner that's close to your natural lip shade can work with almost any lipstick color. It's a real lifesaver.
Exploring Nude and Contrasting Liner Options
Nude liners are super versatile. They can define your lips without adding extra color, making them perfect for that 'no-makeup' makeup look or when you want your lipstick to be the absolute star. You can even use a nude liner to subtly plump up your lips by drawing just outside your natural line, then filling it in with lipstick.
Contrasting liners are a bit more advanced, but they can be fun! Using a liner that's a shade or two darker than your lipstick can add dimension and make your lips look fuller. It's all about creating a bit of shadow and shape.
Using a liner that's slightly darker than your lipstick can create a subtle ombre effect, making your lips appear fuller and more defined. Just be sure to blend it well!
Choosing Shades for Your Skin Tone
This is where things get personal. What looks amazing on one person might not be the best for another, and that's totally okay. It's all about finding what makes you feel good.
Here’s a general guide:
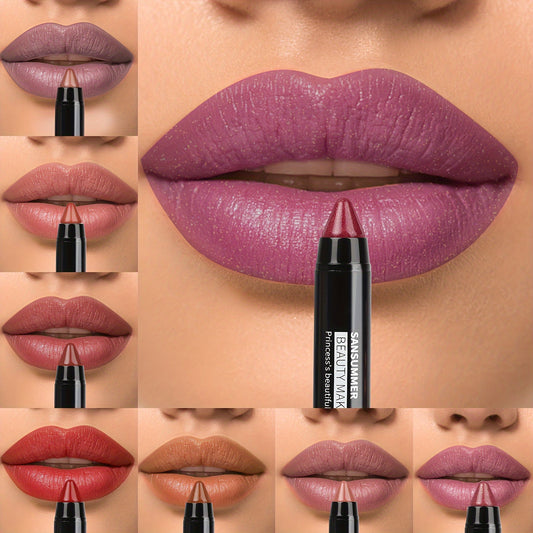
- Fair Skin Tones: Look for liners and lipsticks in soft pinks, peaches, and light nudes. Berry shades can also be lovely for a bit more color.
- Medium Skin Tones: You can pull off a wider range! Think rosy browns, warm mauves, and corals. Deeper reds and berries look fantastic too.
- Deep Skin Tones: Rich berries, deep plums, chocolate browns, and vibrant reds are usually stunning. Look for liners with a bit more pigment to really show up.
Ultimately, the best way to find your perfect pair is to experiment. Swatch shades on your hand, see how they look in different lighting, and don't be afraid to try something new. Your lips will thank you for it!
Lip Prep: Creating the Perfect Canvas for Lipstick Application
Getting your lips ready before you even think about liner or lipstick is a big deal. It’s like prepping a wall before you paint it – you want it smooth and ready for the color. If your lips are dry or flaky, the liner and lipstick won’t go on nicely, and they definitely won’t last. So, let’s talk about making sure your pout is in tip-top shape.
Gentle Exfoliation for Smoothness
First things first, get rid of any dry skin. You don’t need fancy products for this. You can use a soft washcloth with a little bit of water and just gently rub it over your lips. It’s a simple way to slough off those little flakes. Another easy method is to mix a bit of sugar with some lip balm or coconut oil and gently massage it onto your lips in a circular motion. Rinse it off, and you’ll feel a difference right away. Smooth lips are happy lips, and they take color much better.
Hydrating with Lip Balm
After exfoliating, your lips might feel a little bare. That’s where lip balm comes in. Slap on a good, hydrating lip balm. Look for ones with ingredients like shea butter, beeswax, or natural oils. Let it soak in for a few minutes before you start with your liner. This step adds moisture and makes your lips feel comfortable, which is always a good thing. It also helps the liner glide on more easily.
The Role of Lip Primer for Longevity
If you really want your lip color to stay put and look its best all day, consider using a lip primer. Think of it as a base coat for your lips. It creates a smooth surface, helps prevent your lipstick from bleeding into those little lines around your mouth, and can even make the color appear more vibrant. Some primers also have a matte finish, which can help your lipstick last even longer. It’s an extra step, sure, but for a long-lasting, polished look, it’s totally worth it.
Defining Your Lips: Expert Techniques for Lip Liner Application
Alright, let's talk about actually getting that lip liner on. This is where the magic starts to happen, shaping your lips before the lipstick even comes into play. It’s not as complicated as it sounds, honestly. Think of it like drawing, but for your mouth.
Sharpening Your Liner for Precision
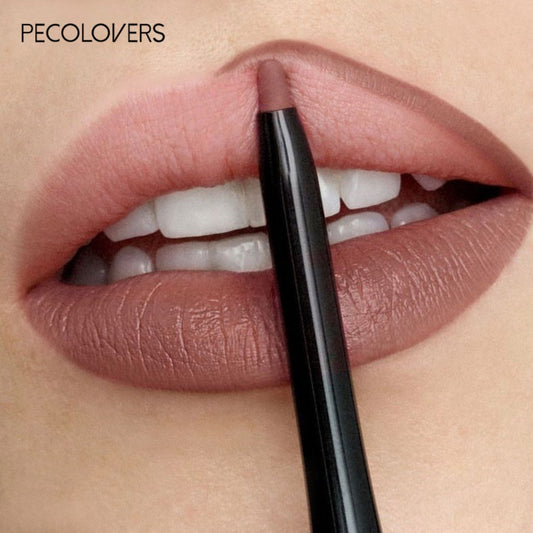
First things first, grab your lip liner. If it’s all blunt and sad, you’re going to end up with a messy line, and nobody wants that. A sharp lip liner is your best friend for clean, defined edges. It’s like using a sharp knife for chopping veggies versus a dull one – way easier and much neater. So, take a minute to sharpen it up before you even think about touching it to your lips. It makes a huge difference, trust me.
Outlining Natural Contours
Now, let’s get to the actual drawing part. You want to follow the natural shape of your lips. Don’t try to force a completely different shape unless you’re going for something super dramatic. Just trace along your lip line. Start from the center and work your way out to the corners. It’s a good idea to do your top lip first, paying attention to that little dip in the middle, the Cupid’s bow. Then move to the bottom lip. Keep your strokes light and steady. You can always go over it again if you need more definition, but starting light is key.
Enhancing Definition and Fullness
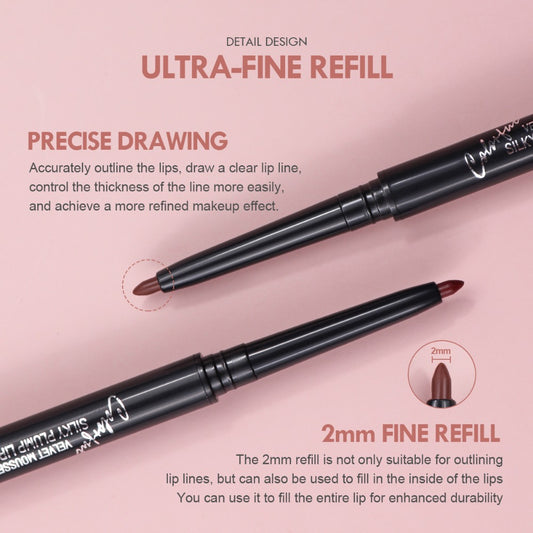
This is where you can get a little creative. If you want your lips to look a bit fuller, you can trace just outside your natural lip line. Don’t go crazy, though. Just a tiny bit, especially in the center of your top and bottom lips, can make a noticeable difference. It’s all about creating a subtle illusion. You can also use the liner to fill in any uneven areas or to make your Cupid’s bow look a little sharper. Some people even fill in their whole lips with liner before applying lipstick; this can help the color last longer and give it a richer tone.
The Importance of Symmetry
Getting both sides of your lips to match can be tricky. It’s easy to end up with one side looking a bit higher or fuller than the other. Take a step back and look in the mirror often as you’re lining. If one side looks a little off, gently adjust it. You can use the tip of your liner to make small corrections. The goal is to have your lips look balanced. It doesn’t have to be perfectly identical, but you want them to look like they belong together. It’s all about making your pout look naturally even and pleasing to the eye.
Lip liner isn't just about color; it's about structure. It provides a base and a guide, preventing your lipstick from wandering into those little lines around your mouth. Think of it as the frame for your favorite picture.
Painting the Perfect Pout: Tips for Lipstick Application
Now that your lips are perfectly outlined, it's time to bring on the color! Applying lipstick might seem straightforward, but a few tricks can make a big difference in how polished and long-lasting your pout looks. It’s not just about slapping on some color; it’s about building it up right.
Starting Application from the Centre
When you start applying your lipstick, aim for the middle of your lips first. This is where you want the most color to be. Think of it as the focal point. By placing the lipstick here and then working outwards, you get a really even distribution of color right from the get-go. It helps build up the intensity where you need it most.
Working Outward for Even Coverage
Once you've got that color in the center, gently sweep the lipstick towards the corners of your mouth. Try to keep the pressure steady. You don't want it to be thicker in one spot and lighter in another. Take your time with this part. It’s better to do a couple of light coats than one heavy one that might end up looking messy or bleeding outside your liner.
Blotting and Reapplying for Longevity
Want your lipstick to stay put longer? Here’s a little secret: blot. After your first layer, gently press a tissue onto your lips. This takes off any extra product that might smudge later. Then, apply a second layer of lipstick. This really locks in the color and makes it last way longer. It’s a simple step, but it makes a huge difference for that all-day wear.
This two-step application, starting from the center and blotting between layers, is key to getting that smooth, even color that doesn't budge easily. It’s like giving your lipstick a solid foundation to sit on.
Blending and Perfecting: Achieving a Polished Lip Look
Now that your lips are prepped and lined, it's time to bring it all together. This stage is all about making sure everything looks smooth and intentional, not like you just slapped some color on. We want that polished, put-together vibe, you know?
Seamlessly Blending Liner and Lipstick
This is where the magic happens, really. You've got your liner defining the shape, and your lipstick filling it in. The goal here is to make those two things look like they belong together, not like they're fighting for attention. The key is to soften any hard edges where the liner meets the lipstick. You can do this a couple of ways. If you used a brush to apply your lipstick, you can use the tip of that brush to gently push the lipstick color over the liner line. Another trick is to use your finger – just a clean fingertip – and gently tap along the edge where the liner and lipstick meet. It’s a subtle move, but it makes a big difference in making the whole look feel more natural and less like a coloring book.
Using Tools for Softened Edges
Speaking of tools, a small, dense lip brush is your best friend here. After you've applied your lipstick, dip the very tip of the brush into the lipstick color (or even a bit of the liner color if you need to adjust). Then, carefully go over the line where the liner and lipstick meet. It’s like a little cleanup crew for your lips. You’re not trying to redraw anything, just gently diffuse the line so it’s not so stark. It helps everything look more blended and professional. Some people even use a tiny bit of concealer on a small brush around the very outer edge of the lips to clean up any mistakes or to sharpen the overall shape, but that’s a bit more advanced.
Achieving a Long-Lasting Result
Want your work to stick around? After you've blended everything, grab a tissue. Gently press it between your lips – don't rub, just press. This is called blotting. It takes off any extra lipstick that isn't really set. Then, apply another thin layer of lipstick. This layering technique really helps the color last longer and makes it less likely to transfer onto everything you touch. You can even dust a tiny bit of translucent powder over the tissue while blotting for an extra-long-wear boost, though that can sometimes make the finish look a bit drier, so use it sparingly.
Making Your Lip Look Last
Making your lip look last is all about a few key steps. It’s not just about slapping on color and hoping for the best, you know? There are ways to make sure that perfect pout stays put throughout the day, or night.
Investing in Quality Lip Liner
First things first, you really need to start with a good lip liner. Think of it as the foundation for your lipstick. A quality liner, one that’s not too waxy or too dry, will actually help your lipstick stay where it’s supposed to. It creates a barrier, stopping color from feathering into those little lines around your mouth. Plus, a good formula feels comfortable, not like it’s sucking all the moisture out of your lips.
Filling Lips with Liner for Endurance
Don't just outline your lips with liner. A pro tip for making your color last is to actually fill in your entire lips with the liner. After you’ve defined the shape, go over the whole area. This creates a consistent base for your lipstick. It’s like priming a canvas before you paint. When you then apply your lipstick over this filled-in base, it has something to grip onto, which means it won't fade or disappear as quickly.
Tips for a Smudge-Proof Finish
Want to avoid lipstick on your coffee cup or your partner’s cheek? There are a few tricks. After you’ve applied your lipstick, take a thin tissue and gently press it between your lips. This is called blotting. It removes any excess lipstick that might otherwise transfer. Then, you can reapply another thin layer of lipstick. This double application, with blotting in between, really locks the color in. Some people even dust a tiny bit of translucent powder over the tissue while blotting for extra staying power, though that can sometimes make the finish look a bit dry if you’re not careful.
Want your lipstick to stay put all day? We've got the secrets to making your lip color last longer. From picking the right shade to using simple tricks, you can keep your lips looking great without constant touch-ups. Ready to learn how to make your lipstick last?
Your Perfect Pout Awaits
So there you have it! Applying lip liner with lipstick isn't some big secret; it's just a couple of simple steps that make a real difference. Whether you want your lipstick to stay put all day or just want to shape your lips a bit more, liner is your friend. It’s not about being perfect, it’s about trying it out and seeing what looks good on you. Don't be afraid to play around with different colors and techniques. You've got this!
Frequently Asked Questions
Should Your Lip Liner Be Lighter or Darker Than Your Lipstick?
It's usually best to pick a lip liner that's the same color or just a bit darker than your lipstick. This helps define your lips and makes them look neat. It also stops your lipstick from spreading where it shouldn't.
Can You Use Lip Liner Alone?
Yes, you can totally wear lip liner by itself! It's great for an everyday look. Just pick a natural color, use it to shape your lips, and maybe add a clear balm on top for a finished look.
Should You Start with Lip Liner or Lipstick?
It's a good idea to start with lip liner before lipstick. The liner helps shape your lips, keeps lipstick from bleeding, and creates a base that can make your lips look bigger.
How Do I Overline My Lips for Fuller Looking Lips?
To make your lips look fuller, start by drawing around your natural lip line with a lip liner. You can even go a little outside the lines, especially in the middle part of your lips. Then, gently blend the liner with your lipstick. Adding a bit of gloss in the center can make them look even bigger!
Are You Supposed to Blend Lip Liner?
Yes, blending your lip liner into your lipstick makes everything look smooth. It softens any hard lines and makes your lips look more natural and full. It's all about making the colors blend together nicely.
What Lip Liner Shade Makes Lips Look Bigger?
A lip liner that's a little darker than your natural lip color can make your lips appear fuller. The darker shade adds depth, making your lips look bigger. For an extra boost, put a lighter lipstick or gloss in the very middle of your lips after blending the liner.